There are many DMR programming guides, but I wanted to do a quick checklist to remind me how I did it.
- Get your DMR ID.
- Apply for a DMR ID at https://radioid.net/register#!.
- Needs a valid Ham Radio License.
- Takes a few days
- Fully read and understand this page. Be careful filling out information in correct fields.
- Create a new download folder to contain your working files (eg. Anytone Radio Software)
- Anytone AT-D878UV – Go to https://bridgecomsystems.freshdesk.com/support/solutions/articles/63000105978-anytone-878-878-plus-cps-firmware-and-driver-downloads
- Get the latest CPS and Firmware (1.21 as of Sep 2020)
- Anytone AT-D868UV – Go to https://bridgecomsystems.freshdesk.com/support/solutions/articles/63000105671-anytone-868-cps-firmware-and-driver-versions
- Get the latest CPS and Firmware (1.39 and 2.39 as of Sep 2020)
- Go to https://powerwerx.com/help/software-downloads#dmrcontacts and get a dump of the latest Ham DMR contact list in CSV format for import into the Anytone.
- Get the DMR Talkgroup list in CSV format. https://brandmeister.network/?page=talkgroups
- Delete Column ‘D’ with heading
- Delete Column ‘A’ with heading ‘Country’
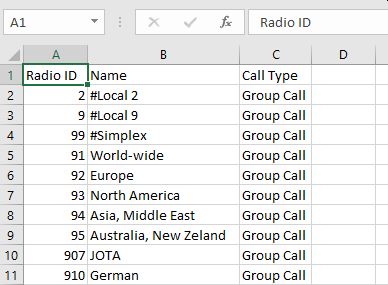
- Rename Heading ‘Talkgroup’ to ‘Radio ID’
- Add the following (I use the # to distinguish these special channels)
- 2, #Local Network, Group Call
- 9, #Local Repeater, Group Call
- 99, #Simplex, Group Call
- 9990, #Parrot, Private Call
- Anytone AT-D878UV – Go to https://bridgecomsystems.freshdesk.com/support/solutions/articles/63000105978-anytone-878-878-plus-cps-firmware-and-driver-downloads
- Get 7-Zip from https://7-zip.org and install.
- Extract the CPS, Firmware, and other files from the Zip file you downloaded.
- Install the CPS software. It will try to install to the wrong Drive, correct it to your C: drive.
- Plug in your radio to the USB cable and turn it on.
- If the Radio doesn’t show up as a Com port in Windows Devices and Drivers, then use the included GD Virtual Com Driver (v2.0.2.4994) in a RAR file. You will need 7zip to open this.
- Unplug your Radio while you install the driver. Plug your radio in and give it a few moments to register.
- Unlock the keyboard using these instructions – https://youtu.be/dzFqEM-yC7A
- Update your radios firmware using the CPS software
- Bridgecomm and others have excellent videos
- Add your DMR ID to the radio
- Select Digital > Radio ID List
- In the #1 slot, put your DMR ID in the Radio ID column and your Callsign in the Name.
- In the CPS, import the contact list and talkgroups into your radio.
- Select Tool -> Import
- Click on Talkgroups, select your modified Talkgroups CSV file.
- Click on Contacts, select your downloaded Contact CSV file.
- Click on Import
- This will take a while for the contacts to import
Resources
- Anytone Radios – http://www.anytone.net/
- Bridgecomm Systems – https://www.bridgecomsystems.com
- Miklor – https://www.miklor.com/DMR/
- Miklor – https://www.miklor.com/DMR/DMR-Network.php
- Programming Parrot TG – https://www.n1clc.com/2019/03/dmr-tip-1-using-parrot-talkgroup-to.html
- Anytone 868/878 and similar mods – http://members.optuszoo.com.au/jason.reilly1/868mods.htm